Floor Fitting & Installation Guides, Flooring Advice & How To Guides
Installation Guide for Laminate Flooring
10
Aug
Aug
This comprehensive guide will walk you through the process of installing laminate flooring, a popular and durable choice for many homes. By following these step-by-step instructions, you can achieve a professional and long-lasting finish. Proper preparation is the most critical part of this project, so be sure to read all instructions carefully before you begin.
Pre-Installation Checklist
Tools & Materials
- Laminate flooring planks
- Laminate underlay
- Tape measure
- Pencil or marker
- Utility knife
- Hand saw or circular saw (for straight cuts)
- Jigsaw (for irregular cuts)
- Tapping block
- Rubber mallet
- Pull bar or pry bar
- Spacers (8-12mm)
- Safety goggles and knee pads
- Broom and vacuum cleaner
- Levelling compound (if required)
Site Preparation
Thorough preparation is the key to a successful laminate flooring installation. Do not skip these steps.
- Acclimatise the Flooring: Place the unopened boxes of laminate flooring flat in the room where they will be installed for at least 48 hours. This allows the material to adjust to the room’s temperature and humidity, preventing expansion or contraction after fitting. The ideal room temperature should be between 18°C and 26°C.
- Clear the Room: Remove all furniture and existing floor coverings, such as carpet, old vinyl, or linoleum.
- Prepare the Subfloor: The subfloor must be completely clean, dry, and level. Sweep and vacuum thoroughly to remove all dust and debris. Use a long straight edge to check for any unevenness; any dips or humps greater than 3mm over a 1m run should be corrected.
- For concrete floors: Use a self-levelling compound to create a perfectly flat surface. If there is any risk of moisture, a damp-proof membrane is essential.
- For wooden floors: Ensure all floorboards are securely fastened and free from movement. Nail or screw down any loose boards. Cover with a minimum of 6mm flooring-grade plywood, securing every 150mm.
- Plan the Layout: Before laying, perform a “dry run” by placing a few rows of planks to determine your starting point and laying pattern. This will help you avoid thin slivers of flooring at the end of a row and allow you to plan where cuts will be made. It’s often best to start from the longest, most visible wall and work towards the door.
Step-by-Step Installation Instructions
- Install the Underlay: Roll out the laminate underlay. Lay it at a 90-degree angle to the direction you will be laying the laminate planks. Trim the underlay to size with a utility knife and use tape to secure the joins, ensuring there is no overlap.
- Begin the First Row: Start in a corner, along the longest wall. Place the first plank with the tongue side facing the wall. Use spacers to maintain a consistent 8-12mm expansion gap between the flooring and the wall. This gap is essential to allow for natural movement of the flooring.
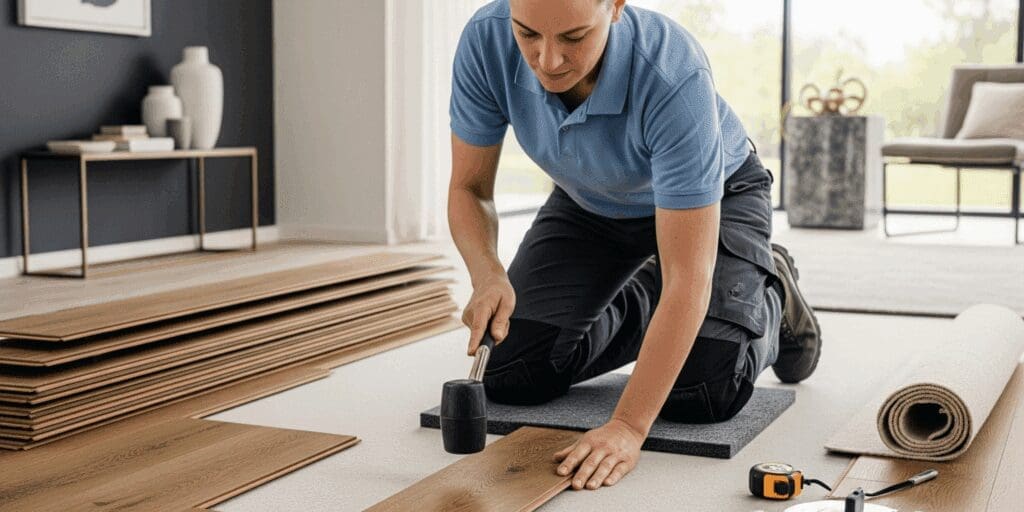
- Connect the Planks: Take the second plank and connect the short end to the first plank. Angle and click the plank into place. Using a tapping block and a rubber mallet, gently tap the planks together until they are flush and the join is tight.
- Cut the Last Plank: When you reach the end of the first row, measure the remaining distance and subtract the expansion gap (8-12mm). Use a pencil and a straight edge to mark the cut line on the plank. Cut the plank with a saw and place the cut end against the wall, maintaining the expansion gap.
- Start the Second Row: The offcut from the last plank of the first row (if it’s at least 300mm long) can be used to start the second row. This will create a staggered, natural-looking pattern. If the offcut is too short, cut a new plank in half to begin the row.
- Lay Subsequent Rows: Angle the second-row plank and click it into the long side of the first row. Once the row is complete, use a pull bar and a tapping block to ensure all joins are snug and tight against the previous row. Repeat this process, staggering the joints by at least 300mm between rows for stability and appearance.
- Make Cuts Around Obstacles: For door frames, pipes, or other awkward shapes, create a template out of paper or cardboard. Trace the template onto the laminate plank and use a jigsaw to carefully cut the required shape. Always remember to account for the expansion gap.
- Complete the Final Row: The final row will likely need to be cut to size lengthwise. Measure the distance from the last full plank to the wall, subtract the expansion gap, and mark the cut line. Cut the planks to the correct width and use a pull bar to lock the final row into place against the previous row.
Post-Installation Tips & Troubleshooting
After Installation
- Remove all spacers from around the room.
- Wait at least 24 hours before placing heavy furniture.
- Install skirting boards or beading to cover the expansion gaps around the perimeter of the room. Nail these to the wall, not the floor, to allow the laminate to move freely underneath.
Common Problems and Solutions
- Gaps Appearing Between Planks: This is often caused by not allowing the flooring to acclimatise or by not tapping the planks together tightly enough. Use a tapping block and mallet to close any small gaps.
- Lifting or Peaking at Joints: An uneven subfloor is the most common cause. Any imperfections in the subfloor will eventually show through the laminate. Ensure the subfloor is perfectly level before you start.
- Clicking Sounds: If you hear a clicking sound when you walk on the floor, it’s usually a sign that the subfloor is not completely flat. The planks are moving slightly. Re-check the subfloor’s levelness and consider using a self-levelling compound.
- Difficulty Connecting Planks: This can happen if the planks are not properly aligned or if there is debris in the click mechanism. Always ensure the grooves are clean and the planks are at the correct angle before attempting to click them together. A gentle tap with a rubber mallet can help.