Installation & Maintenance
How to Fit Nordikka Bodo Herringbone SPC
Apr
How to Fit Nordikka Bodo Herringbone SPC: A Complete Fitting Guide
Bodo Herringbone SPC is the most involved Nordikka product to install. It combines the click-lock SPC format with a traditional parquet pattern — which means you get the speed advantages of a floating floor, but the setting-out is more demanding than standard Click SPC. The A-strip and B-strip system, the starting triangles and the specific installation direction all matter. Getting the first few rows right is the difference between a showcase floor and one that visibly drifts off as you lay it.
This guide covers the fitting method for Nordikka Bodo Herringbone SPC. If you’re looking at the gluedown herringbone sister product Tromso Herringbone LVT, the installation is completely different — see our Nordikka LVT gluedown installation guide. For standard-plank Nordikka Click SPC, follow our Nordikka Click SPC installation guide — it’s simpler and a better place to start if you haven’t fitted SPC before.
Bodo is fittable by a confident DIY installer, but herringbone is where most DIYers’ first-attempt mistakes become permanently visible. If you’ve never laid herringbone before, we’d recommend getting a professional fitter — the cost of redoing a herringbone floor that’s drifted at an angle is almost always more than hiring someone to do it right the first time.
Understanding A-Strips and B-Strips
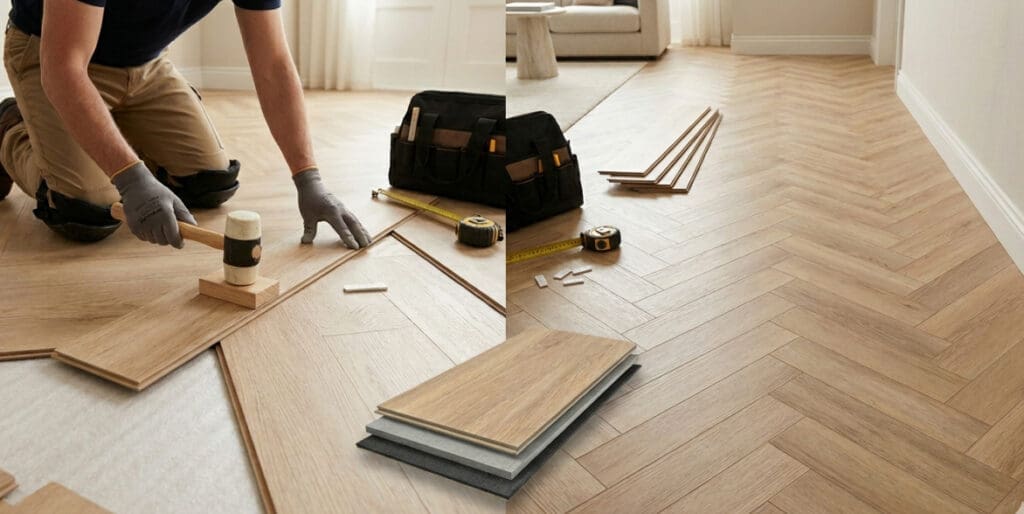
Bodo Herringbone SPC comes as two plank types: A-strips and B-strips. They look identical but their click edges are mirrored — an A-strip clicks into a B-strip and vice versa, but two A-strips won’t click together. This is how the herringbone pattern builds: each plank rotates 90° from its neighbour, and the A/B pairing is what makes the angled joints work.
Open your boxes before you start and separate the A-strips from the B-strips into two piles. The strips will typically be marked on the reverse side. If you accidentally lay two A-strips together, the click won’t engage and you’ll have to lift and re-plan.
You’ll need roughly equal quantities of each — Bodo is typically supplied in balanced packs, but always confirm on delivery that you have enough of both.
Before You Start: Tools and Materials
Tools: Rubber mallet, sharp utility knife with spare blades, steel ruler, tape measure, pencil, chalk line (this matters more than with straight-plank SPC), 4mm spacers, pull bar for final rows, and a vacuum cleaner.
Materials: Bodo Herringbone SPC planks with 15% wastage added — herringbone generates more offcut waste than straight laying, and you’ll want extras for cut adjustments and spares.
On delivery: Confirm you have both A-strips and B-strips, check for damage to click edges (Bodo is sold by the square metre but the strips are smaller than standard planks, so there are more joints — each one needs to be undamaged), and confirm the batch numbers match across all boxes.
Subfloor Preparation
Bodo Herringbone SPC needs the same subfloor conditions as standard Click SPC: level to within 4.7mm over a 3m radius, maximum deflection no more than 1.1mm, and structurally sound.
Because herringbone pattern joints meet at angles, any subfloor imperfection is more visible with herringbone than with straight planks. A dip in the floor that’s tolerable under straight planks will telegraph as a visible distortion in a herringbone pattern. If your subfloor is borderline on the tolerance, take the time to apply a self-levelling compound before starting.
Fill any cracks or holes with repair compound and let it cure fully. Vacuum thoroughly — trapped debris under a Bodo strip shows up immediately because the pattern relies on every strip sitting perfectly flush.
Bodo can be installed over concrete, screed, plywood, and properly prepared timber. It should not be installed over carpet, soft vinyl, existing floating floors, or expansion joints. The 4mm expansion gap at every wall and fixed obstacle is non-negotiable — herringbone that’s pinned at the edges will buckle faster than straight plank.
Acclimating Bodo
Let the Bodo strips acclimate in the installation room for at least 24 hours before starting. Temperature should be between 18°C and 27°C and — importantly — stable. Stack boxes no more than five high during acclimation, and if the strips have been stored below 10°C, extend the acclimation to 48 hours.
Shade south-facing glazing, patio doors and bi-fold doors during acclimation and installation to avoid temperature fluctuations.
Setting Out: The Starting Triangles
This is where Bodo installation differs most from standard Click SPC, and where the majority of installer mistakes happen. Herringbone is laid from a centre line, not from a wall. Your starting triangles establish the whole pattern’s geometry — get them right and the rest of the floor falls into place.
Find the centre line. Measure the room carefully and snap a chalk line down the centre of the room, running parallel to the main source of natural light. This is your reference line — every row will build outwards from it at 45° angles.
Plan the pattern direction. In a rectangular room, the herringbone point typically faces away from the main doorway as you enter — the pattern reads best when you walk into it. Decide on the direction before you lay a single strip.
Build the first two strips. Take an A-strip and a B-strip and click them together at right angles, forming an L shape (or inverted-V, depending on how you’re orienting the pattern). The short click edges engage; the long edges will later click into the strips that run alongside.
Position the starting point. Place your first A-B pair on the chalk line at the end wall where the pattern begins. The 90° angle point of the pair sits on the centre line; the two arms of the L extend out at 45° to either side. Use 4mm spacers at the end wall — the herringbone point must respect the expansion gap just like any other edge.
Dry-lay the first few rows. Before committing, dry-lay three or four rows out from the starting point to confirm the pattern reads cleanly, the strips sit flush, and the angle is consistent. If the pattern drifts, your centre line is off or the starting triangles aren’t at a true 90°. Fix it now — once you’re 20 strips deep, correcting a drift means lifting everything.
Installing: Row by Row
With the starting triangles in place, herringbone builds outwards in rows along the 45° diagonals. Each new strip clicks into the previous strip’s long edge and into the neighbouring strip at the 90° joint.
Installation direction. Work outwards from your starting triangles in both directions along the centre line, building the pattern row by row. Keep checking the centre line with a string line or straight edge — herringbone drift is cumulative, so an alignment error in row three becomes very visible by row twenty.
Click method. As with standard Click SPC, hold each new strip at roughly a 30° angle, engage the long-edge click with the strip in the previous row, then lower into position. Tap gently with a rubber mallet until the joint is fully closed and the strip sits at the same height as its neighbours. If a strip won’t sit flush, don’t force it — lift, check for debris in the click, clean, and retry. Forcing a damaged click permanently compromises the joint.
Staggering. Unlike straight plank SPC, herringbone doesn’t stagger the same way — the pattern itself creates a naturally staggered geometry. What matters is that your A-strips and B-strips alternate correctly: every angled joint should be an A-to-B engagement, never A-to-A or B-to-B.
Alignment check every few rows. Herringbone is less forgiving of cumulative drift than straight plank. After every three or four rows, use a straight edge or string line to confirm the pattern is still tracking correctly. Small deviations can be corrected by adjusting a single strip; large deviations mean lifting back to the error.
Cutting the Herringbone Pattern
The cutting line for Bodo Herringbone SPC is where straight-plank instincts let you down. Because the strips meet at 45° angles, you’re not cutting straight across a plank — you’re cutting at angles to match the pattern geometry.
Scoring the strips. Place the strip face-up. Using a sharp utility knife against a steel ruler, score firmly along your cut line several times on the same pass. For straight cross-cuts (at plank ends), the score-and-snap method works the same as standard SPC. For angled cuts at the room perimeter, mark the cut line carefully against the existing pattern before scoring.
Perimeter cuts. The outer edge of a herringbone floor always involves angled cuts against the wall — this is normal and intentional. Measure each perimeter cut individually against the adjacent installed strip, allowing for the 4mm expansion gap, and mark before cutting. Don’t try to pre-cut perimeter strips in batches — the angles vary slightly along any wall, and batch-cut perimeter strips rarely fit.
Pipes. Where a pipe penetrates the floor, measure the pipe location on the strip, drill a hole 12mm larger than the pipe diameter, then saw the strip in half through the hole. Install the strip around the pipe and glue the sawed-off piece back into position.
The Final Rows
The last rows at each wall are the most fiddly part of a Bodo installation. You’ll need to cut strips at angles that match the room’s geometry, and the click engagement with the previous row has to still work even as the strips get smaller.
Marking the cut. Lay a full strip on top of the last installed row, positioned so the click edges line up with where the next row should engage. Lay a second strip on top of that one, pushed against the final wall (with a 4mm spacer to maintain the expansion gap). Trace along the edge of this upper strip onto the middle strip — this gives you the cut line for the middle strip.
Final engagement. Cut along the traced line and use a pull bar to engage the click on the final row — a rubber mallet alone won’t reach into tight perimeter positions. Repeat for each strip along the final wall. Remove spacers once the final strips are in.
The minimum width of any final-row strip should be 50mm. Any smaller than that and the strip won’t have enough structural integrity to hold the click; adjust the width of your starting pattern at the opposite wall to compensate if your measurements suggest a very narrow final row.
Finishing: Mouldings and Thresholds
Once Bodo is fully laid and spacers removed, fit decorative mouldings or skirting boards to the walls — never to the floor. Leave a small clearance between the bottom of the moulding and the flooring surface so the floor can move freely.
Where Bodo meets another flooring type at a doorway, use an appropriate transition profile. Bodo’s angled perimeter cuts mean the expansion gap at transitions can look slightly more prominent than with straight-plank SPC — a wider transition profile works well here, both functionally and visually.
When to Call in a Professional
Bodo is realistically DIY-able by someone who’s fitted Click SPC before and is comfortable working from a chalk line. But herringbone adds a pattern-accuracy dimension that amplifies every small mistake. The angled starting triangles, the A/B alternation, the perimeter cuts and the alignment drift are all forgiving in isolation and unforgiving when they stack up.
If you’re fitting herringbone for the first time, we’d strongly recommend using a professional fitter — or at minimum, practising on a small area (a utility room, a WC) before tackling a large open space like a hallway or open-plan kitchen. Grosvenor Flooring offers a full supply and fit service across Cheshire and South Manchester, including Bodo herringbone installations.
After Installation
Bodo is walkable immediately after installation, though the floor benefits from 24 hours of stable conditions before heavy traffic or furniture. Fit felt pads under furniture legs and castor cups under heavier items before moving anything back.
See our Nordikka flooring aftercare guide for the protection and cleaning routine that keeps the pattern looking sharp long-term — herringbone shows wear more visibly than straight plank, so consistent care matters more here. Retain five spare Bodo strips from your installation batch for warranty purposes (herringbone typically needs more spares than standard plank because individual replacements are harder to source-match later).
Shop Bodo and Order Free Samples
Grosvenor Flooring is an approved UK online retailer for Nordikka, stocking Bodo Herringbone SPC and the complete Nordikka flooring collection with transparent online pricing and direct checkout. Order up to 5 free Bodo samples and we’ll post them to you at no cost — the visual impact of herringbone at full scale is something product photos can’t convey.
Our Altrincham showroom displays Bodo alongside every other Nordikka range at full scale, on a 24/7 smart-lock system. For more on the design decision between Tromso gluedown and Bodo click herringbone, read our Nordikka herringbone flooring guide. To see how Bodo fits within the wider Nordikka collection, see our Nordikka ranges explained guide, and for a full product assessment read our Nordikka flooring review. Comparing Nordikka against the premium brands? Our Nordikka vs Amtico vs Karndean comparison covers the key differences. Ready to buy? See where to buy Nordikka flooring for full stockist information.