Installation & Maintenance
How to Install Nordikka LVT
Apr
How to Install Nordikka LVT: The Complete Gluedown Installation Guide
Gluedown Nordikka LVT is a permanently bonded floor — the planks are fixed directly to the subfloor with adhesive and, once installed correctly, deliver a seamless, solid finish with no movement or deflection. This guide covers the gluedown installation method for every Nordikka gluedown LVT range: Nordikka Living, Nordikka Original, Nordikka Select gluedown, the new Nordikka Naturals and Tromso Herringbone LVT. For click SPC formats, see the Nordikka Click SPC installation guide; for the click herringbone format, see the Bodo herringbone fitting guide.
The single most important thing to understand about gluedown installation is that the laying method itself is not the hard part. Subfloor preparation, moisture control and adhesive selection determine whether the floor performs for the next 20 years or fails within 12 months. Get those three right and a careful installer can lay a beautiful gluedown floor. Skip them and the best laying technique in the world will not save the job.
Before You Start: What You Need
Every Nordikka gluedown installation requires the same core material list:
- Nordikka planks — ordered with a minimum 10% wastage allowance. Naturals installations in herringbone or tile format should allow 12–15% to account for the additional cutting.
- Approved LVT adhesive — matched to the subfloor type and whether underfloor heating is in use.
- Smoothing compound — minimum 3mm application over most subfloors.
- Primer — where specified by the adhesive or smoothing compound manufacturer.
Essential tools include a notched trowel matching the adhesive manufacturer’s specification, a 68kg articulated floor roller, a sharp utility knife with spare blades, a straight edge, tape measure, chalk line, hygrometer and a high-quality vacuum. When the material arrives on site, verify the batch codes match across all boxes, confirm colours and quantities against the order, and inspect every box for transit damage before opening.
Subfloor Preparation: The Part That Matters Most
The subfloor must be clean, dry, level and structurally sound. Surface regularity tolerance is 5mm deviation over a 2m straight edge for standard plank installations — but herringbone and tile installations require a tighter 3mm tolerance over 2m. That tighter tolerance applies to Tromso Herringbone LVT and to the herringbone and tile formats within Nordikka Naturals.
Concrete subfloors need an effective damp-proof membrane beneath the slab and a minimum 3mm smoothing compound application before the adhesive goes down. Power-floated concrete must be shot-blasted to open the surface before treatment — the smooth finish from floating is too dense for most adhesives to bond to reliably.
Gypsum and calcium sulphate screeds require specialist primers and should always be checked against the adhesive manufacturer’s compatibility data before starting. Timber subfloors need a 5.5mm flooring-grade plywood overlay (EN 636-3, EN 314-2 Class 3), with joints staggered brick-bond fashion, fixed at 100mm centres along board edges and 150mm centres across the field.
Moisture Testing — Non-Negotiable
Relative humidity in the subfloor must test at 75% or lower, measured with a hygrometer over a full 72-hour period, before installation proceeds. This is not a step to skip or shortcut. Gluedown adhesives fail in high-moisture environments, and once the floor is down you have no way to dry the slab beneath it.
New concrete typically requires approximately one month of drying per 25mm of thickness for the first 50mm. Deeper slabs need proportionally extended drying periods — a 100mm slab is not twice as slow as 50mm, it is considerably slower. If the programme is tight, get moisture testing scheduled as early as possible and plan accordingly.
Acclimating the Planks
Nordikka planks, the plywood overlay and the adhesive must all acclimate in the installation room for a minimum of 24 hours. The room needs to be held at a constant temperature between 18°C and 27°C during acclimation and installation. If the planks have been stored below 10°C in transit or storage, extend the acclimation period to 48 hours.
Stack boxes no more than five high during acclimation, and remove individual planks from the boxes only 30 minutes before fitting. Cover any south-facing glazing during acclimation, installation and for 24 hours afterwards — direct solar gain through glass can drive localised surface temperature well above the room average and cause movement or distortion before the adhesive has cured.
Installing Over Underfloor Heating
Underfloor heating systems must be fully commissioned, then switched off and allowed to cool for 48 hours before installation begins. The system stays off throughout the install and for a minimum of 48 hours afterwards. Never activate underfloor heating to try to dry the adhesive — you will cause adhesive failure and floor movement.
When the system is finally brought back online, increase the heat gradually over several days up to a maximum subfloor temperature of 27°C at the adhesive line. Exceeding 27°C will compromise adhesive bonds and cause long-term damage to the floor. Only specialist high-temperature or epoxy adhesives are suitable for underfloor heating applications — standard LVT adhesives will not tolerate the thermal cycling.
Fitting Nordikka Naturals Plank and Tile
Nordikka Naturals plank installs to the standard straight-plank method — start from an end wall with staggered end joints never closer than 150mm in adjacent rows, and keep minimum plank cut length at 150mm. At 3.0mm overall thickness with a 0.7mm wear layer, Naturals is the heaviest-specification Nordikka gluedown plank on the market, which places a small premium on subfloor flatness — a true 5mm over 2m tolerance is more important here than on thinner planks.
Nordikka Naturals tile format runs to the tighter 3mm over 2m subfloor tolerance. Set out tiles from the centre of the room using perpendicular chalk lines rather than laying from the wall, so that any tile cuts at the perimeter are symmetrical. Dry-lay the first run to confirm pattern alignment and cut widths before committing to adhesive.
Fitting Herringbone — Tromso and Nordikka Naturals
Both Tromso Herringbone LVT and the herringbone format within Nordikka Naturals follow the same setting-out method, and both require the tighter 3mm over 2m subfloor tolerance. Layout begins from the centre of the room using a chalk line — not from the longest wall as with standard plank. Dry-lay several rows first to confirm the pattern aligns correctly and that end cuts at the perimeter will exceed 150mm width.
Directional arrows on the reverse of each tile must be oriented consistently throughout the installation. Get this wrong even once and the pattern will jump visibly across the floor. Herringbone gluedown is a professional-installation format on any project that matters — we would not recommend it as a DIY job.
Setting Out and Laying the Floor
Prepare the work area by removing equipment left by other trades and vacuuming the subfloor thoroughly. Record moisture readings as documentation — they form part of the warranty record. For standard plank installations, begin from an end wall with staggered end joints never closer than 150mm in adjacent rows. Minimum plank cut length is 150mm.
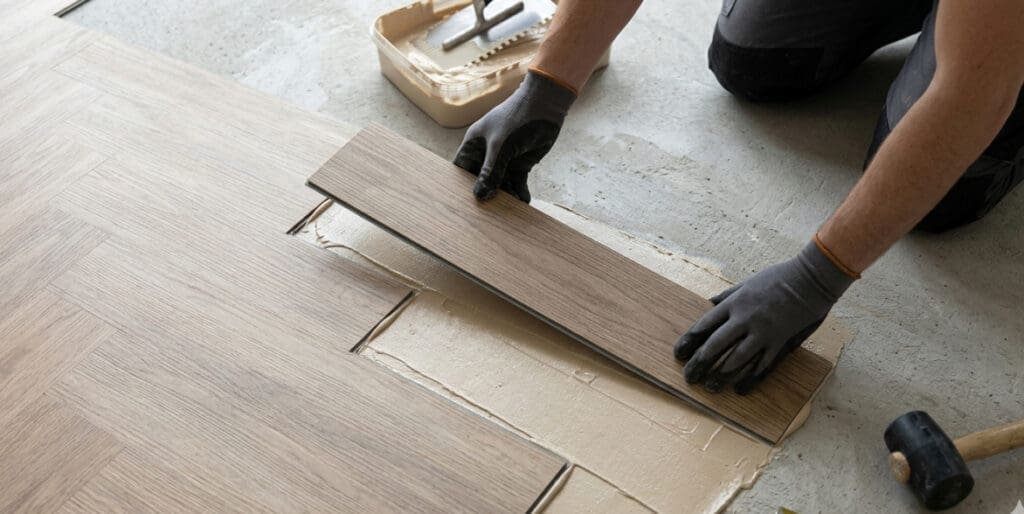
Spread adhesive in sections within its working open time — every adhesive has a specified open time, and exceeding it will compromise bond quality. Never pre-spread adhesive across the whole floor before laying. Once planks are laid, roll thoroughly in both directions with the 68kg roller to expel air and ensure the full bed of adhesive has transferred onto the plank backing. Rolling is not optional — it is the step that secures the bond.
After Installation
Allow 24 to 48 hours curing time per the adhesive manufacturer’s specification before returning furniture to the room. Heavy items in particular should not be placed until the adhesive has fully cured, and furniture should be lifted rather than dragged. Retain three spare planks from the installation batch, keep the purchase receipt and the installation records together, and document the moisture readings taken at install. All of this matters if a warranty claim is ever needed.
Why We Recommend Professional Installation
Small, well-prepared floors with good access and straight-plank formats are DIY-feasible for a confident installer. Larger rooms, poor or uneven subfloors, underfloor heating, herringbone patterns and tile formats all increase the difficulty and the cost of getting it wrong.
Tromso Herringbone LVT and Nordikka Naturals herringbone both warrant professional installation because of the pattern-precision requirements. Nordikka Naturals tile is similarly a professional job — the tight subfloor tolerance, setting-out and cut work are beyond a typical DIY skill level. If you’d rather have the floor supplied and fitted for you, we offer a supply and fit service across Cheshire and South Manchester.
After You’ve Installed: Aftercare
A correctly installed gluedown floor still needs the right aftercare routine to deliver its full service life. Gluedown installations should not be mopped or loaded with heavy furniture for 24 to 48 hours after installation, and the day-to-day cleaning routine matters more than most customers expect. Our Nordikka flooring aftercare guide covers cleaning products, stain removal, furniture protection, environmental conditions and warranty-preservation rules.
Further Reading
For a detailed breakdown of every Nordikka range by specification and application, see our Nordikka flooring ranges explained guide. If you’re comparing Nordikka against premium alternatives, our Nordikka vs Amtico vs Karndean comparison covers the key differences in design, durability and price. For a full product assessment, see our Nordikka flooring review. And to buy, see where to buy Nordikka flooring or browse the full Nordikka flooring collection.
To see Nordikka at full scale before you buy, visit our Altrincham showroom — every range in the Nordikka collection is on display at full plank scale, 24/7 on a smart-lock system.