Installation & Maintenance
How to Install Nordikka Click SPC
Apr
How to Install Nordikka Click SPC Flooring: Step-by-Step DIY Guide
Click SPC is the easiest LVT format to fit yourself. There’s no adhesive, no 68kg roller, no open time to race against — just a rigid-core plank with a click-lock edge that snaps together over the top of the subfloor. A competent DIYer can realistically install Click SPC in a standard room in a day, provided the subfloor is properly prepared and the planks have been acclimated.
This guide covers the installation method for Nordikka Click SPC, and applies equally to the click-SPC format of Nordikka Select. If you’re fitting the gluedown format of Living, Original, Select, or Tromso Herringbone, the method is completely different — see our Nordikka LVT gluedown installation guide. For Bodo Herringbone SPC, the installation has a very different setting-out method — follow our Bodo herringbone fitting guide instead.
What You Need Before You Start
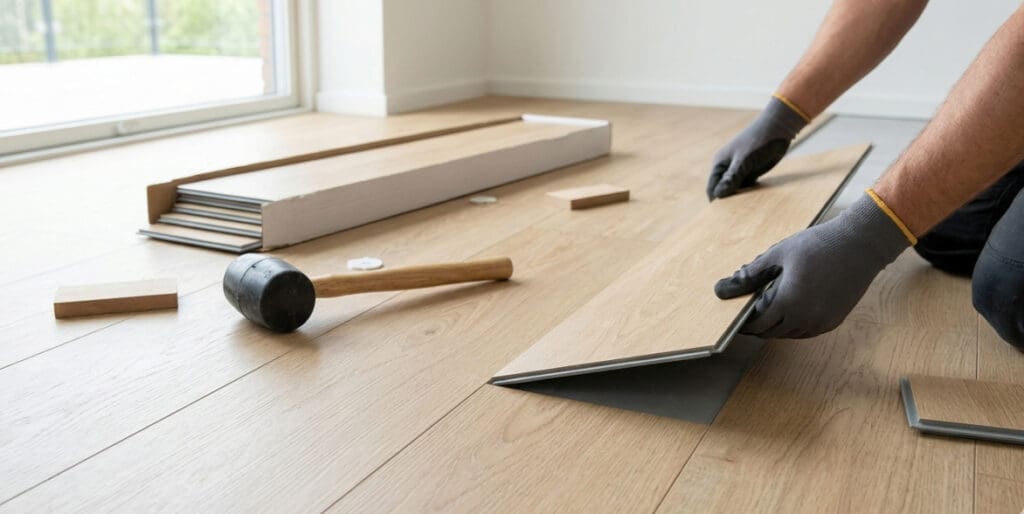
Click SPC needs fewer tools than gluedown LVT, but the ones you do need matter. Don’t skimp on the rubber mallet — a regular hammer will damage the click edges.
Tools: Rubber mallet, sharp utility knife with spare blades, a steel ruler or straight edge, tape measure, pencil, spacers (4mm), a pull bar for the final row, and a vacuum cleaner. A string line helps you check alignment every few rows.
Materials: Nordikka Click SPC planks with 10% wastage added for cuts. No adhesive needed — that’s the whole point of click.
On delivery: Check that all boxes are from the same batch, colours match your order, quantities are correct and there’s no visible damage to the click edges. Damaged click mechanisms are the most common cause of installation difficulty — a plank that won’t sit flush usually has a compromised edge.
Subfloor Preparation
Click SPC is more forgiving of subfloor imperfections than gluedown LVT, but “more forgiving” doesn’t mean “anything goes.” The subfloor must be level to within 4.7mm over a 3m radius, and maximum deflection — how much the floor flexes underfoot — must be no more than 1.1mm.
Clean the subfloor thoroughly. Fill any cracks or holes with a suitable repair compound and let it cure fully before installation. If you have high spots or ridges, grind them down. A heavily uneven subfloor will eventually cause click joints to fail or planks to flex underfoot, so it’s worth taking time to get it right.
Click SPC can be installed over most hard subfloor types: concrete, screed, existing tiles (provided they’re firmly fixed and level), plywood, and properly prepared timber. It should not be installed over carpet, soft vinyl, or floating floors. Remove those first.
If your subfloor fails the flatness test, apply a self-levelling compound following the product manufacturer’s instructions, let it cure fully, then test again before laying.
Acclimating Nordikka Click SPC
Every Nordikka SPC plank and its packaging need to acclimate in the room they’ll be installed in. Room temperature should be stable between 18°C and 27°C (ideally 20°C to 22°C) for at least 24 hours before installation begins.
Stack boxes no more than five high during acclimation. Don’t acclimate in a garage or outbuilding — the fluctuating temperature doesn’t give the planks a chance to stabilise to their eventual working environment. In rooms with large south-facing windows, bi-fold doors or patio doors, shade the glazing during acclimation, installation, and for 24 hours afterwards.
If the planks arrived in cold weather or have been stored below 10°C, extend the acclimation period to at least 48 hours.
Planning the Layout
A few minutes of planning before you lay the first plank prevents the single most common Click SPC problem: a narrow sliver of a plank making up the final row. Click SPC planks need space to expand and contract as temperature and humidity change. Ignore that, and the floor buckles.
Expansion gap: Leave a 4mm gap between the edge of the floor and every wall, pipe, doorframe or fixed obstacle. For pipes, drill the hole 12mm larger than the pipe diameter so the plank can move around it without being pinched. These gaps will be covered by skirting or trim mouldings after installation — the moulding attaches to the wall, not to the floor.
Plank staggering: End joints in adjacent rows must be at least 180mm apart. Closer than that and the floor looks patterned rather than random, and the click joints are weaker at the staggers. Plan the first and last rows to be wider than 50mm minimum — if your room’s width means the last row would be thinner than 50mm, reduce the width of the first row to balance it.
Direction: Most installers lay Click SPC parallel to the main source of natural light in the room. Visually it’s the cleanest choice — the plank length runs with the light rather than fighting it.
Subfloor joints: Where possible, avoid placing Click SPC plank joints directly over joints or seams in the subfloor below. Any future movement in the subfloor is more likely to telegraph through joints that align.
Starting and finishing rows: Plan so both the first and final rows of planks are a minimum of 300mm in length. Short end-cuts look untidy and the click joints don’t hold as well.
Installing the Floor: Row by Row
Vacuum or sweep the subfloor a final time before you start laying — any debris caught under a plank will telegraph through the floor. Remove thresholds and skirting boards if necessary (you’ll reinstate them once the flooring is down). Decide which wall you’re starting from and work left to right.
First plank: Place the first plank with the grooved edge facing you and the tongue edge against the starting wall. Use 4mm spacers between the wall and the plank to maintain your expansion gap.
First row: Lay the second plank end-to-end with the first, interlocking the short-edge click. Tap gently with a rubber mallet until the joint is fully engaged and both planks sit at the same height. If the planks aren’t flush, don’t force them — remove the second plank, check for debris in the click mechanism, clean it, and try again. Forcing a compromised click will permanently damage the joint.
Continue across the first row towards the opposite wall. For the final plank in the row, measure the required length to leave a 4mm expansion gap at the far wall, then cut to size.
Cutting planks: Place the plank face-up. Using a sharp utility knife against a steel ruler, score firmly along your cut line several times on the same pass — you’re not cutting through the plank, you’re deeply scoring the wear layer. Then place one hand close to the score and press down firmly while lifting the other half with your other hand. The plank will split cleanly along the scored line.
Second and subsequent rows: Use the offcut from the end of the first row to start the second row, provided it’s at least 300mm long. If it’s shorter, discard it and cut a new plank to the starting length — ensuring the end joint is at least 180mm from any end joint in the previous row. Using offcuts as row starters is the simplest way to naturally stagger the pattern while minimising waste.
Click-locking between rows: Hold the new plank at roughly a 30° angle, engage the long-edge click with the plank in the previous row, then lower it into position. Tap gently along the long edge with the rubber mallet until the joint is fully closed and the plank sits flush. Check heights as you go — a single plank that isn’t fully clicked down will throw off every row after it.
Alignment check: After every two or three rows, lay a string line along the leading edge to check the floor is running straight. If it’s drifting, the cause is usually an uneven starting wall rather than poor laying — the first row may need to be re-trimmed to compensate.
Pipes and obstacles: Measure the pipe location carefully and drill a hole 12mm larger than the pipe diameter. Saw a section out of the plank to fit it around the pipe, then glue the sawed-off piece back into place once the plank is around the pipe. A matching colour sealant fills the saw line.
Final row: Measure the gap between the last laid plank and the opposite wall (less 4mm for expansion). Lay a full plank directly on top of the last completed row. Place a second plank on top of that with its tongue edge touching the final wall. Trace along the edge of this upper plank to mark a cut line on the first plank. Cut the first plank along that line — this gives you the exact width needed. Use a pull bar to engage the click on the final row. Remove the spacers once installation is complete.
What Not to Do with Click SPC
A few installation mistakes void the warranty and cause premature failure. They’re all avoidable.
Don’t install over expansion joints. Building expansion joints move. Continuous Click SPC over them will crack or gap. Lay the flooring up to either side of the expansion joint and use a proprietary transition profile over the joint itself.
Don’t install kitchen cabinets or islands on top of the flooring. The weight pins the floor in place and prevents the expansion and contraction that Click SPC relies on. Fit the cabinets first, then lay the flooring around them.
Don’t use rubber-backed underlay or mats during or after installation. Rubber can cause discolouration where it sits on the wear layer. Use felt underlay where underlay is specified, and non-rubber-backed mats for ongoing floor protection.
Don’t skip the expansion gap. Even on a small room, the 4mm gap at every perimeter edge is what lets the floor move as temperature changes. A floor fitted tight to the walls will bow or lift at the joints within weeks.
Finishing: Mouldings, Thresholds and Transitions
Once the floor is laid and spacers removed, fit decorative mouldings or skirting boards. These attach to the wall, never to the flooring. A small gap between the bottom of the moulding and the surface of the floor is correct — it lets the floor move without binding under the moulding.
Where the Click SPC meets a different flooring type (carpet in an adjoining room, ceramic tile in a kitchen entrance), use an appropriate transition profile. Transition strips both hide the expansion gap and protect the click edge at the join.
After Installation
Click SPC is walkable immediately after installation — unlike gluedown LVT, there’s no adhesive cure time. But the floor still benefits from 24 hours of stable room conditions before heavy traffic or furniture placement. Fit felt pads under furniture legs and castor cups under heavier items before moving anything back into the room.
For routine care, see our Nordikka flooring aftercare guide — the protection and cleaning routines you use in the first few weeks genuinely affect how the floor looks in ten years’ time. Retain three spare planks from your installation batch for warranty purposes, and keep your purchase receipt and installation records together.
Shop Nordikka and Order Free Samples
Grosvenor Flooring is one of Nordikka’s approved UK online retailers, stocking the complete Nordikka flooring collection with transparent online pricing and direct checkout. Order up to 5 free samples and we’ll post them to you at no cost. For a look at the full range at scale, our Altrincham showroom displays every Nordikka range on a 24/7 smart-lock system — visit whenever suits you, including evenings and weekends.
For more on which Nordikka range suits your project, read our Nordikka ranges explained guide. If you’re deciding between Click SPC and gluedown, our Nordikka flooring review covers both formats. Comparing Nordikka against the premium brands? Our Nordikka vs Amtico vs Karndean comparison breaks down the differences. And for buying in the UK with full online pricing, see where to buy Nordikka flooring. Prefer Grosvenor to supply and fit? Our supply and fit service covers Cheshire and South Manchester.